Customizing my Micro Editor
Tree view, color scheme, Markdown preview, and much more in µ Editor
in open source, english, bash

The Micro is a text editor that is almost like an evolution of nano. For some time, I've been using it for quick edits in the Terminal, but now I've decided to use it for more robust projects and step back a bit from the all-in-one VS Code. For this, I needed to take an afternoon to customize it, and I decided to write this on my blog because the documentation isn't very comprehensive.
The editor allows extending functionalities with plugins written in Lua, besides creating macros, it has mouse support, and has a Terminal emulator. Below are the extensions I added.
Tree View
To activate the tree view, it's necessary to download and install the filemanager plugin. And here we have some issues.
The version available in the Micro's official repository is not the best option because it lacks some bug fixes, and the one in the plugin repository doesn't address them either. I found this fork of the plugin that solves the bug of opening new files in tabs instead of splitting the screen. However, this version doesn't fix bugs related to file creation and renaming via command prompt (something that the official Micro version fixes). So, what I did was to merge both codes and manually install the plugin.
I've placed the version I'm using in this repository.
To install, create the filemanager directory in .config/micro/plug and insert the files. Done. Type ctrl+e to access the command prompt and type tree.
Notes:
- In line 267 of the
filemanager.luafile, you can change the default pane size. Currently, it's set to 30. - To keep the tree view always open when starting the editor, type
set filemanager.openonstart truein the command prompt. - Switch between the tree and the opened file using the shortcut
ctrl+wor the mouse. - Switch between tabs using the shortcut
alt+>andalt+<or the mouse.
Quoter
This plugin allows you to select a portion of text and insert various characters, such as [], {} e (), at the beginning and end of the selection. This is similar to a feature in VS Code that I find important to have.
Here's how to set it up:
- In the terminal: $
micro -plugin install quoter - By default, it comes set to ON, to deactivate it in Micro's command prompt (accessed with
ctrl-e), typeset quoter.enable off.
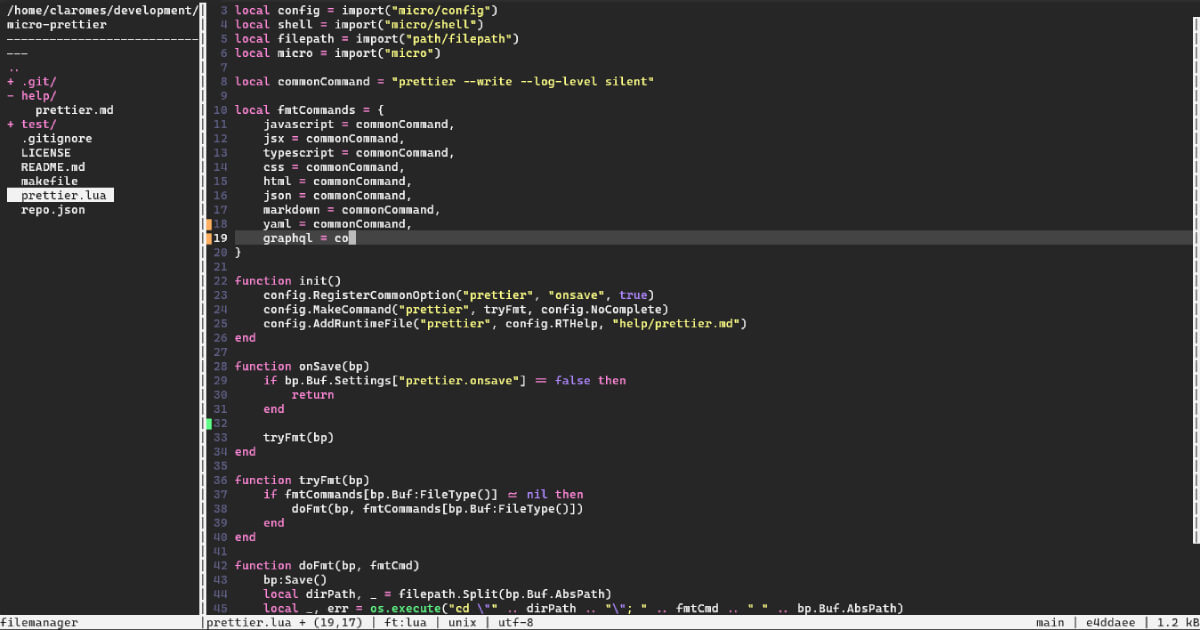
Formatter (Prettier and YAPF)
The autofmt plugin is simple, useful, and covers various languages, but it has bugs and is not up to date. In this case, since it was just one repository, I forked it and fixed the code by initially changing it to a plugin only for Prettier. And while writing this text, I made a copy of the modified code and created one specifically for YAPF (Python).
The usage and installation instructions are in the README of each formatter: Prettier and YAPF. I haven't included them in the official Micro repository yet, but I intend to. For other languages, I use formatters, but they are specific cases, such as for PHP in WordPress. However, I didn't find it necessary to create a plugin for that use case, for now.
I decided to maintain these plugins to avoid depending on the community and also separated them because I don't want to maintain formatters that I don't use.
Markdown Preview
The Micro Editor doesn't have this functionality, but since we're in the bash environment, we can use a tool that helps visualize Markdown files.
I always like to preview my READMEs before committing, and the Python library grip helps with that. It's simple to install and use.
$ pip install grip
$ grip -b file.md
The -b option automatically opens a new tab in the browser.
Note:
- It's possible to use it with the Terminal emulator within Micro with
term grip -b file.md, but I prefer to use bash itself because, in my case, the log doesn't open in another tab, and the screen doesn't split. So, I split the Terminal screen, with the Markdown file on one side and the grip log on the other.
Color Scheme
There are plenty of options available on GitHub, and after finding your favorite, just follow these steps:
- Create a directory named
colorschemesin.config/micro. - Create (or paste) a file with the name of your scheme and with the extension
.micro. - Configure Micro via the command prompt:
set colorscheme schemename.micro.
I tested several and ended up with Dracula (in VS Code, I use the editor's default dark theme).
EditorConfig
Nothing to say.
$ micro -plugin install editorconfig
Default Plugins
With Micro, some plugins come included, and I want to highlight:
comment: Simply place the cursor on the line and use the shortcutalt+/. The line will be commented according to the language used.diff: Integrates thediffgutterwith Git. In the command prompt:set diffgutter true.status: Allows customization of the status line, including Git information. You can customize the left side withstatusformatland the right side withstatusformatr.
Below is my settings.json with the configurations I use.
{
  "*.js": {
    "tabsize": 2
  },
  "*.py": {
    "tabsize": 4
  },
  "*.ts": {
    "tabsize": 2
  },
  "autosu": true,
  "colorscheme": "dracula",
  "diffgutter": true,
  "eofnewline": true,
  "ignorecase": false,
  "mkparents": true,
  "pluginchannels": [
    "https://raw.githubusercontent.com/micro-editor/plugin-channel/master/channel.json"
  ],
  "pluginrepos": [],
  "scrollbar": true,
  "softwrap": true,
  "statusformatr": "$(status.branch) | $(status.hash) | $(status.size)",
  "tabstospaces": true,
  "wordwrap": true
}
Read more about the options and default plugins.
Conclusion
Micro is a good editor, which takes some effort to customize, but for those who want a "larger" GNU nano, this is a great tool. It's far from perfect and can't be compared to products like VS Code. I'll continue using both editors.
This is what my Micro looks like: